Create Invoice
Menu Path: Trading > Sales > Create Invoice.
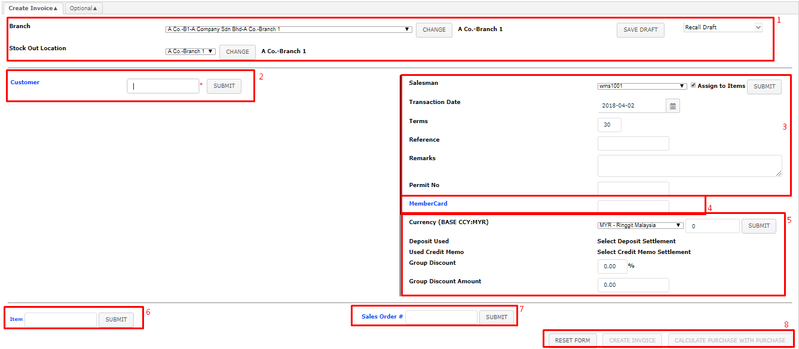
- Select Branch and click "Change"
- Select Stock Out Location and click "Change"
- By default, the stock out location will follow Location Setting at Branch Configuration
- Refer to Trading Configuration for the activation of "Stock Out Location"
![]()
- Click "Save Draft" to hold the invoice → make sure permission is enabled for create invoice underTrading (Permission)
- Choose "Recall Draft" to call back the saved invoice → make sure permission is enabled for create invoice under Trading (Permission)

- Key in Specific Customer PKID or click on CUSTOMER for search function
- Insert customer details or keywords in text box to do a fuzzy search. Otherwise, similar operation can be performed by inserting the search criteria in text box beside CUSTOMER. To filter customer status (i.e. all / active / inactive), choose the option accordingly in the drop down list before enter a "Search".
* Customer listing can't be deleted. Especially those with transaction. - To add an account, click "Add Corporate Account" or "Add Personal Account" to create a corporate and personal customer respectively.
- Key in this Account PKID in FSCS page to load a customer.
- To select a customer from the search result, click the customer Account Name to use that customer in cash sale.
- To add a contact person to a customer, click "Add Contact Person" to proceed. The contact person created will be recorded in the respective customer account.
- Insert customer details or keywords in text box to do a fuzzy search. Otherwise, similar operation can be performed by inserting the search criteria in text box beside CUSTOMER. To filter customer status (i.e. all / active / inactive), choose the option accordingly in the drop down list before enter a "Search".
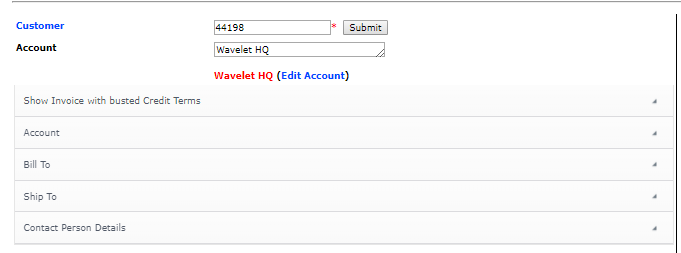
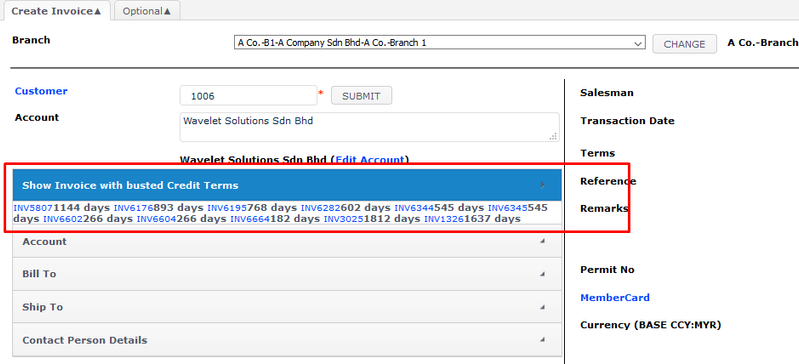
- Show Invoice with busted Credit Terms: By default, the busted invoice will shown which might cause slowness when creating invoice. User may refer to Trading (Permission) to disable showing the invoice with busted credit terms
- Ship To : By default, delivery is assumed to be the same as the billing address. For customer with multiple branches or locations, users could add "Contact Person" to the account, and click on it when selecting the customer. When a contact person is selected, the invoice will change the "Delivery Address" to follow that of the contact person, and this could be different from the billing address.
- Customer Name become Red if customer reach the credit limit → customer credit term under Customer Maintenance

NOTES:
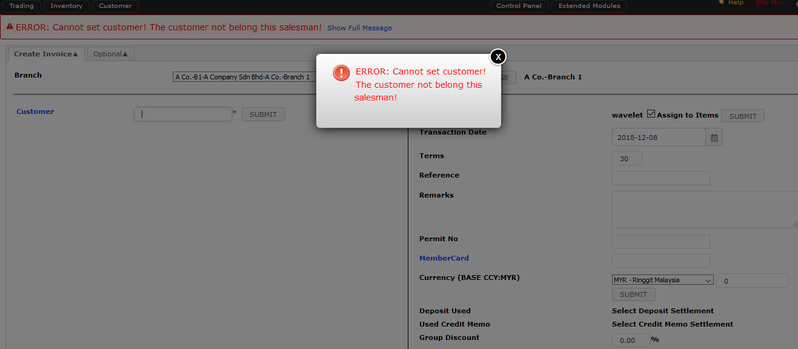
- Refer to Trading (Permission) to enable user to see ALL Customer which include other salesman's
- System will show error when the permission is disabled
- Key in Registered Member card ID or click MEMBERSHIP for search function
- Refer to Membership Program module for more details
- To insert specified billing recipient, key in the recipient details (eg: name, address etc) in to "Bill To"
- Key in specified mobile number
Sample of search item for registered Member
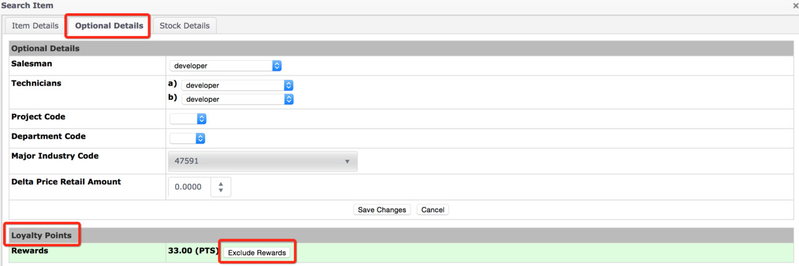
If apply membership#, when key in (search for) items, by default the reward and redemption scheme will be automatically applied for this member card. User can check the reward amount at 'Optional Details' tab under Loyalty Points section.
NOTE: If for reason that reward points are not being rewarded to customer, click on 'Exclude Rewards'button before you click the 'Submit' button.
- Select Currency Base, Rate and click Submit → if any. Refer to Forex Credit Memo for details
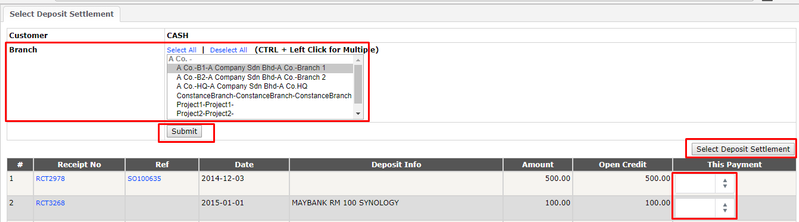
- To contra the cash sale from deposit or credit memo created before (as paying mechanism), click "Select Deposit Settlement" or "Select Credit Memo Settlement" respectively.
- Select branch from drop down list and click "Submit". You may select multiple branches by using CTRL button or all branches by "Select All" button. (Credit Memo Settlement layout may vary.)
- When the receipt list generated, select the equivalent receipt used to contra the cash sales. Key in the amount under "This Payment" column.
- To proceed, click "Submit" button below.
- Key in group discount in Amount or Percentage
- The discount will be automatically result in related GL code
- Select the Sales Lead → Check Trading Configurations to Enable, Trading (Permission) for Compulsory Permission and Drop Down List for creation
- Key in the Item Code or click ITEM for search function → Need to be more than 2 characters

- Click "Submit"
- Key in BOM Item under Configuring Bill of Materials or click PACKAGE for search function
- Scan the Serial Number (if any) and click "Submit"

- Insert item search criteria or keyword in the text box
- Tick on options box:
- Allow search for description option allows search the item description. Untick this option will make the search result includes only the Item Code.
- Show Average Cost option allow the display of result to show an additional column of Average Cost/Moving Average Cost of the items. Click on View/Hide for this option will hide such information.
- Show Last Cost option allows the display result to show an additional column of Last Purchase Cost of the items. Click View/Hide for this option will hide such information.
- To filter item status (i.e. all / active / inactive), choose the option accordingly in the drop down list before enter a "Search".
- To filter item type (e.g. inventory, service, GL code etc), choose the option accordingly in the drop down list before enter a "Search". Default option (i.e. "All") will search all the item types.
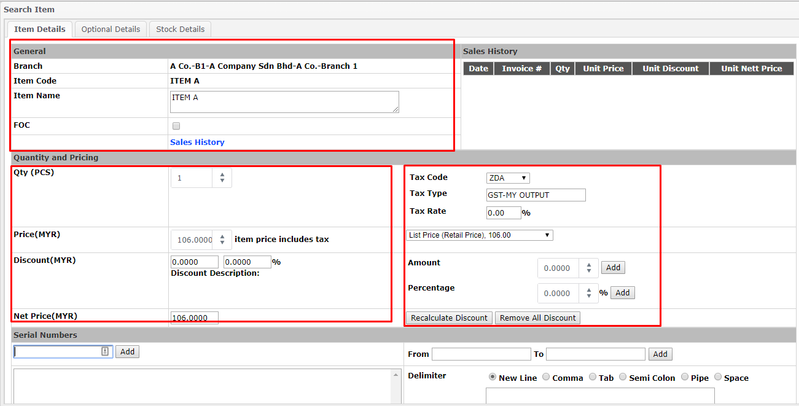
- Item Name will follow item code which configured under the Item Maintenance.
- FOC refers to Free of Charge. Tick this box to sell the item as free item
- Key in Qty (PCS) which refers to the quantity to be sold.
- Price will follow item code which configured under the Item Maintenance. It can be changed manually (if the permissions given) or select from Pricing drop down list which configured under the Item Maintenance
- Promotion also shown at Pricing Drop Down list which configured under Pricing Matrix
- Discount will shown upon inserted in AMOUNT or PERCENTAGE
- Recalculate Discount applies if user change the item price after adding the discount
- Remove Discount to remove all the discount added, including Promotion/Pricing Matrix
- Net Price equals to Price minus Discount
- Serial Number List text box allows you to insert one serial number manually.
- Otherwise, for selling multiple serialized same items, user can use this Delimiter column. Copy the multiple serial numbers from data source to the big text box, and order by available delimiter choice.
- New Line: one line one serial number, click "Enter" to insert new line
- Comma: "," as delimiter
- Tab:
- Semi Colon: ";" as delimiter
- Pipe: "|"(Shift +\) as delimiter
- Space: " " as delimiter
Click Add after pasting the serial number with correct delimiter to add them into the cash sale list.
Click Remove to

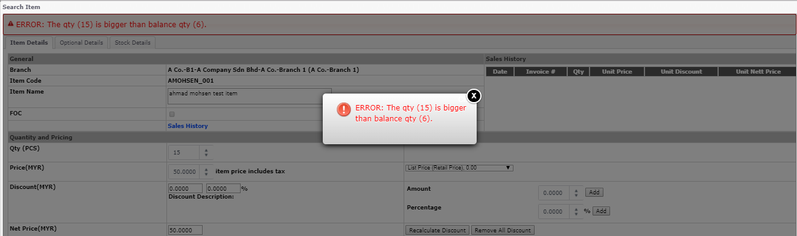
- Balance Qty (PCS) shows the current balance of the related item in the branch set
- Remarks(optional) text box can be used to put additional information of the sale of the related item → will shown at 'Remarks' column under Journal and also at 'Description' column under Document Pop Up

- Refer to Red Box above, system will calculate and show "Total Sales Exclude Tax" when the tax configuration is detected
- System allows to show Rounding option when adding item → base on configuration
- By default it is 4 decimal places and the new configuration allows up to 12 decimal places
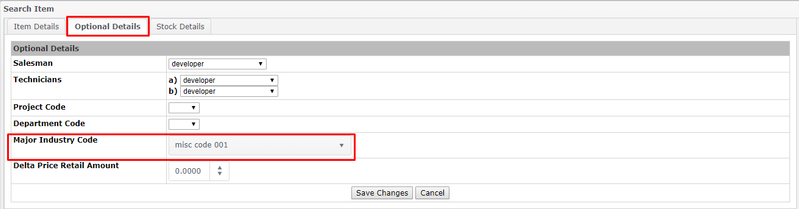
- Major Industry Code by item available upon search item function at Optional Tab
- Stock Details Tab shows stock information which guided by permissions
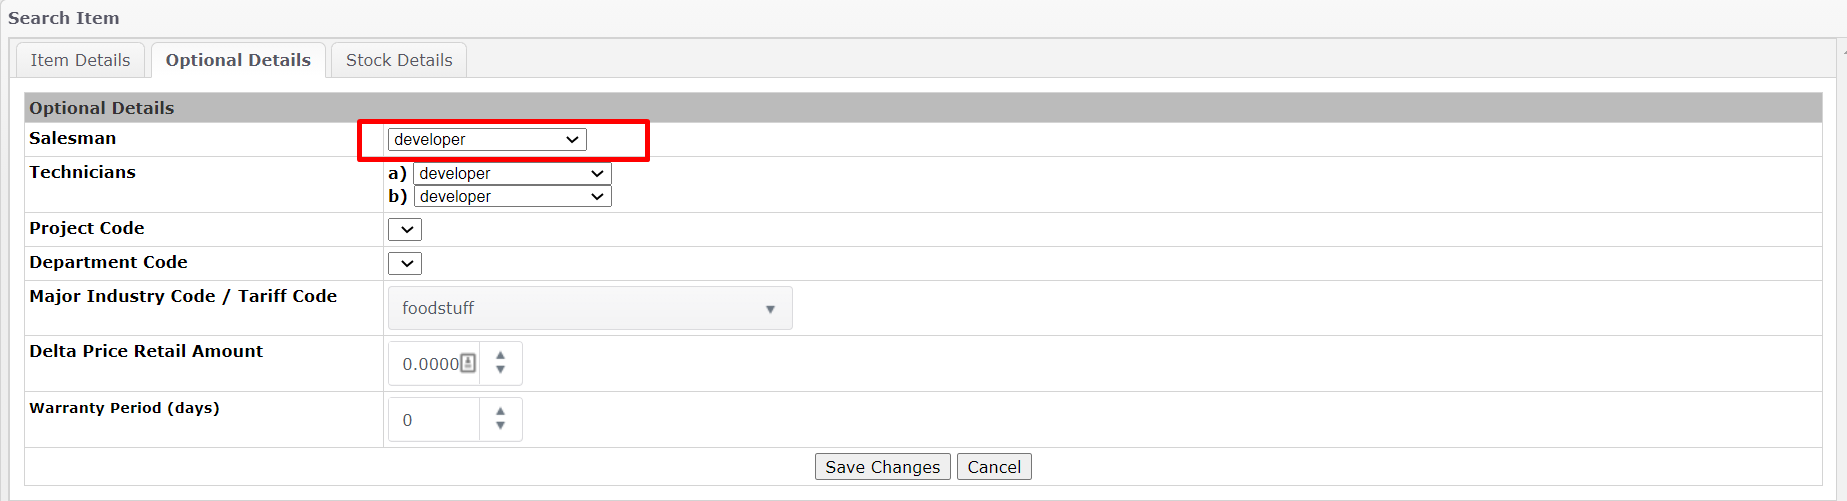
- Salesman also can be assigned manually to each item by selecting the salesman in the optional tab.

- Average Cost → show the MA cost
- Last Cost → last Direct Receiving Stock
- Reset MA → show the last Reset MA done
- Minimum & selling price, replacement cost, minimum & maximum purchase price → set up under Item level
- The item type search might be different from each user as system is "memorizing" the user's FIRST selection

- Key in the Sales Order Number or click Sales Order # for search function
- Click "Submit"
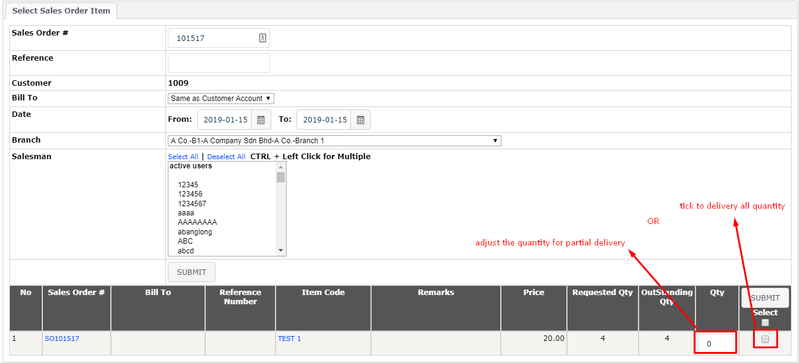
- Key in Specific Sales Order Number, Reference, Specific Customer ID, Date Range, Branch and Salesman for additional Fiters → if any
- Click "Submit"
- Tick the related Sales Order and Adjust the quantity for partial delivery
- Click "Submit"
- System will give error message when the Sales Order Quantity is bigger than Stock Available
NOTES:
OPTIONAL TAB
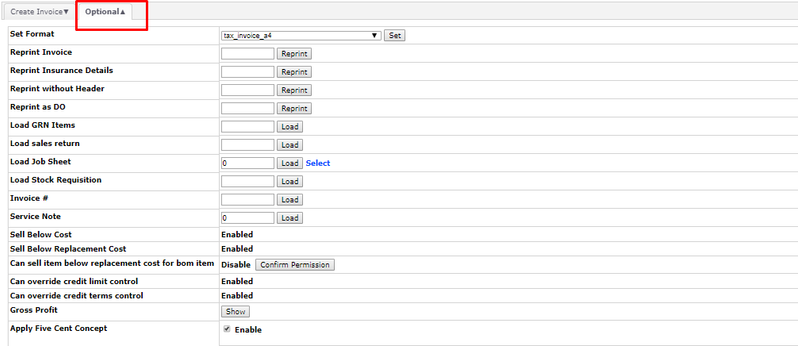
- Users can reprint the invoice or could change the printing format when necessary while creating invoice
- Users can Load the GRN, Sales Return, Job Sheet, Stock Requisition, Invoice, and Service Note number in to Create Invoice Page
- Sell Below Cost, Replacement Cost, Limit Control and Gross Profit are controlled by permission
CREDIT CONTROL
- EMP build in the credit control feature in the screen. When a customer is black listed, or it's credit terms or credit limit have busted the pre-set values of this account, users will not be able to save the invoice.
- Users could contact the HQ or personnel with the permission to modify the status from "Black Listed" to "OK" and change the credit limit.
- The list of outstanding invoices will also be displayed on the screen alerting the person issuing the bill.
INTEGRATION WITH INVENTORY
- When an invoice is saved, the system will deduct the stock in the inventory module. The moving average cost of the stock is captured at the point when the invoice is issued. Hence, if there's a back dated invoice, the current average stock value is used, instead of the back dated average stock.
PACKAGES
- A package consist of a set of items as specified by the Bill of Material in the inventory module. After pulling out a package, users could modify the content of the package while creating an invoice.
PSEUDO CODE (MULTI-CODE)
- Pseudo Code means "fake code" or "nickname" for a product. For some businesses, they are require to print different product code and product description in the invoice, even though they deduct the stock from the real inventory item code behind the scene upon saving of invoices.
CONVERTING JOB SHEET TO INVOICE
- By keying in the job sheet number, users could pull out all details in the job sheet into an invoice for billing purpose. This function is extremely useful to reduce the waiting time. Invoice saved could not be modified, but job sheet could be modified until it has copied to an invoice, and the invoice is saved.
GROSS PROFIT / COST
- Before saving, users could click on the "Gross Profit" button, and a table will appear to show the gross profit of this invoice (total amount - total cost).
- If the gross profit is negative, a warning will appear, alerting the users to double check the pricing.
TAX
- When users enter the price for each item, they could include the Tax amount. The system will calculate the "Net sales" as amount after tax. For the tax to take effect, there are 2 things users should check:
- Item Code maintenance
- Please make sure the tax rate is specified, and tax option is selected.
- System Admin -> Tax Configurations
- Select the GL Code for tax, as well as specifying other options.
- Item Code maintenance
JOURNAL TRANSACTION
- When create invoice , following journal will be created :
Dr: Account Receivables Dr: Inventory Cost |
|---|
Related WIKI Pages:
Found 5 search result(s) for Invoice.
Private & Confidential